background

Thursday, May 17, 2012

Encouragement card

  The card that I am posting today uses our Dotty For You paperpack which is only available until May 31st in honour of National Scrapbooking month.  I've also entered this card into two challenges, the     Heart 2 Heart Polka Dots and Stripes Challenge and also in the open audition for Paper Crafts 2012 Gallery Idol contest. 

I simply layered some of the dotty paper and frayed the edges.  I thought it kind of looked like a window blind.  Then I took a strip of the striped paper and used it instead of ribbon.  I cut out a tag from another one of the B & T pages and stamped it with a sentiment from Pair-A-Phrase. I added some faux stitches to the top.


The inside of course had to have some finishing and so I added another strip of the dot paper.  cut out a ticket from the coordinating B & T paper and stamped it with the rest of the sentiment.  I also added some faux stitching to carry over that element from the front.


I love the vibrant colours of this paper pack and check out what a great deal it is below and then go to my website to place an order.  It's that easy!


Happy scrapping!

Karen


Tuesday, May 15, 2012

Crops of Luv Contest

Hello,
This is my entry for Spellbinders "Crops of Luv" contest.  I love the idea that they are making albums for critically ill children and their families commemorating Make A Wish trips!  Then there is the added bonus of having it also be an entry in a contest for some amazing prizes.  My friend Tasha, from Wild at Heart Studios, and I got together to craft our LO's.  This is mine:


The papers and stickers used for this project were all CTMH.  I used a few stamps from Hero Arts on the tag album, but everything else is CTMH.


Here is a close-up of the mini-tag album that I attached.


 These are all of the individual tags in the tag album.  I made some of them for journalling and some for pictures.  I did both sides.


Sorry that this is sideways, but I wanted to include it to show you that a 3 can be substituted for the 2.  I used removable adhesive dots to temporarily adhere them.  The mats are also temporary so that they can be turned the other way if wanted.  That was one of the criteria for the contest.  At least 5 mats and they should be adjustable.  I think the mini tag album works wonderfully for this.


 I hope you enjoyed the LO as much as I enjoyed making it.  What a wonderful thing the gang at Spellbinder's is doing!

Happy scrapping,

Karen


Tuesday, May 8, 2012

 Hello!  I hope everyone is enjoying the beautiful sunshine today.  This is the project that I completed to donate to our school's Art Auction as a silent auction item.  The fundraising goes towards literacy projects so I am only too happy to donate something.  I heard that someone got a steal of a deal when they were able to purchase this accordian album for $17.00.

I started with the 9 x 9 CTMH Memory Showcase Album.  This  size is no longer available in the catalogue, but they still have a 6 x 6 size available.  I managed to snag a couple of the 9 x 9's when they were on the "While Supplies Last" page on my online website for a mere $3.00.  This page is a great way to pick up some really cool products at a huge discount. 

I decided to use an older paper pack that I had been hoarding for awhile called Veranda.  It has beautiful colours and the coordinating Stickease had the perfect sayings for a Family Showcase Album.  I used the same paper on both the front cover and back,  laying them out so that they flowed towards each other.  That is kind of hard to see in these pictures.  I stamped the word family using the small Chocolate letters and Creme Brulee ink.  I then went over it with Glossy Accents to give it a nice shine.  The bird I cut out of the paper and popped up.  On the back I stamped the sentiment, "Anything is possible" from the March SOTM.  I used Creme Brulee ribbon which I tucked inbetween the paper and the cover before ATG'ing down my paper.  This gave the closed album a nice finished look. 


The next two photos are quick glimpses of the album spread out as if it were on display.  That's the beauty of these accordian style albums, they can become a work of art on display or closed like a beautiful book.


I chose to design this book as if there were 3 two page layouts.  I found this made it easier to plan and organize.  I used my paper pad from CTMH to draw the papers to scale modelling them after designs from the How To Program books.


This first LO is from the Cherish book and is called Simple Pleasures.  I chose to use the greens and browns in the paperpack for this page, keeping it pretty neutral.


   I didn't have any hinges so I used some edge anchors that I had laying around and just opened them up to look like hinges.  The trick was to open them gently enough that they didn't break in half.  The Blessed is a stickease as is the scroll work ribbon that goes across both pages.  The traditions buckle is from Michaels.  I used Versamark and Clear Detail embossing powder for the flourish at the top of the second page. 


This LO was based on a design called the Classical Look found in the Imagine book.  Since it was positioned next to the previous LO, I chose to carry the brown over, but switched up from the olive greens to juniper blue by using patterned paper from the pack that had both in it.  I was further able to lighten up the page and lead into the covers by using the damask paper included in this pack.  These pages included Stickease, stamping, embossing, and I made a little folder.  The life embellishment on the bottom is from the dollar store. 


This was the first time I had used the Soft Set eyelet tools.  Were they ever easy to use.  I wish I had tried them before.  I loved the look of the eyelets and then using floss to lace them together, almost like a corset.  Here is a picture of the back of the eyelets to show how flush they were.


 The last LO is next to the covers.  I used much lighter papers on this as the cover itself is quite light and delicate.  The greens and blues are all pulled together.  That is the beauty of using CTMH paper packs.  Easy peasy coordinating.  In this case, I also used the Creative Basics paper that coordinated with the Veranda paper pack.


 This LO was from the Magic book and is called Magician's choice.  All of the LO's were of course, downsized to fit the album.  That is why drawing it out on the large desk pads makes it so much easier to plan.  Someday I'll take pictures of my desk pad papers and show you what I mean.Some embossing, Liquid Glass and floss ad those little finishing touches to the LO's.  Now that I look at my pictures, I realize that I forgot to add something to the second page, but nobody commented on it that night so I guess it wasn't that noticeable!

Well, that was my special project.  I hope you like it.  I loved making it and I already have plans for another one, which I think I will keep for myself!

Happy Scrapping!!

Karen


Tuesday, May 1, 2012

Thank you card #4

Hello again,

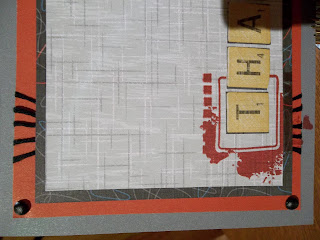
One of the cards had to be for a male, so I decided to make this one more neutral.  Since we were giving it to someone as a thank you for partaking in our literacy night, I thought the scrabble tiles were super appropriate.  Let me know what you think!


 So this card was made from the Cruisin paper pack.  I was surprised at what a different look using this combination of the papers made.  It looks like a completely different paper pack.  The stamp that I used was one that I think had come with a Workshop on the Go, it is called Instant Memories.  I just loved the ink splotch!


 I used a couple of brads and black floss as embelishments.  I cut out the letters from the B & T paper to form the word Thanks and put the first one inside of the film frame stamped in Cranberry.


As usual, I like to "finish" the inside and on this card that was easily done with a strip of the same paper that I used on the front.  The bold colours on the gray, made this card feel masculine to me.  I hope the recipient enjoyed it!

That's all for now.  I have a special project that I made for the school's Art Auction that I will post later this week.  Stay tuned, I really enjoyed making it and did it on fairly short notice!

Happy scrapping!

Karen
 

Great contest by Pink By Design!

Just a quick post to let you know about the "pin it to win it" contest over at Pink By Design.  They are giving away a Silhouette Cameo!  I've heard a lot about this machine and although I love my Cricut, the ability to convert any jpg to a cut is amazing!

Go to their blog and check it out.  Watch the video!

http://www.pinkbydesignstore.com/Cameo-Giveaway-Win-a-Silhouette-Cameo-no-purchase-necessary.html

Posting my last Thank You card later tonight so stay tuned!


Happy Scrapping

Karen